Ultimate Halloween Cheese Board
Why Make This Recipe
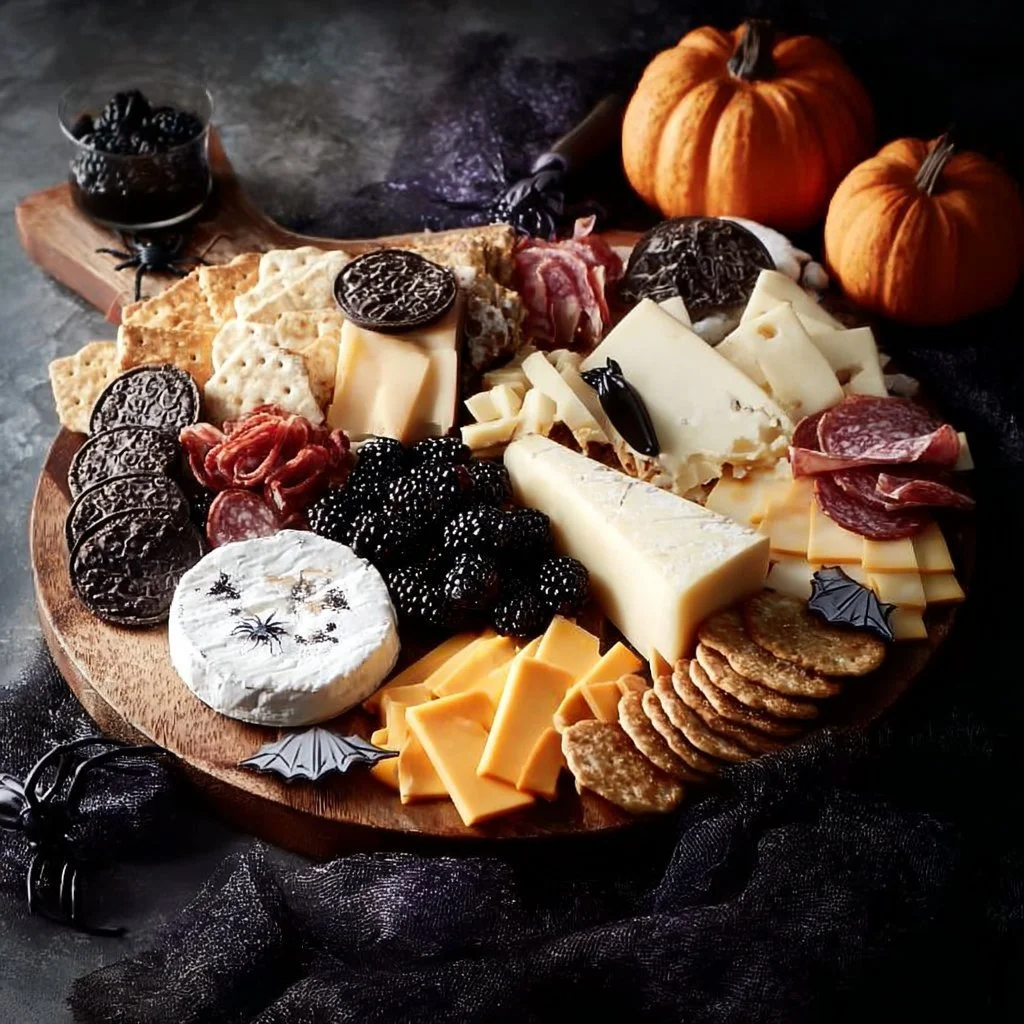
Halloween is the perfect time to get creative with food. One great idea is to create an Ultimate Halloween Cheese Board. Cheese boards are fun, colorful, and allow for easy sharing among friends and family. They mix flavors, textures, and colors that suit everyone’s palate while keeping it exciting and festive for the spooky season.
The Ultimate Halloween Cheese Board is not just delicious but also visually stunning. Imagine a large platter filled with various cheeses, meats, fruits, nuts, and some creepy candy to give it that Halloween twist. It’s a simple and enjoyable way to celebrate the holiday while providing an array of snacks to munch on. It brings people together, making it a perfect centerpiece for any Halloween gathering. Plus, it’s easy to customize based on your preferences.
This cheese board features not just sweets and savory options, but also textures that attract the eyes. With melting cheeses, crisp fruits, and the crunch of nuts, it’s a true delight to the senses. Plus, you can add some themed decorations to your board to give it that extra ghostly feel.
How to Make Ultimate Halloween Cheese Board
Creating your Ultimate Halloween Cheese Board is a fun process that doesn’t require advanced cooking skills. It’s all about arranging the elements in a way that looks beautiful and appetizing. Here’s how to do it step-by-step.
Ingredients
To prepare the Ultimate Halloween Cheese Board, you will need the following ingredients:
- 8 oz Irish Cheddar
- 8 oz Merlot Bellavitano Cheese
- 8 oz Blue D’Avergne Cheese
- 8 oz Goat Cheese Log
- 6 oz Peppered Salami
- 1 box Whole Wheat Mini Toasts
- 1 box Entertainment Crackers
- 1 cup Cornichons
- 8 oz Pear Jam
- 1 cup Black Olives
- 1 cup Fresh Mozzarella Balls
- 2 cups Seasonal Fruits (Pomegranate, Bosc Pear, Blackberries)
- 1 cup Nuts (Praline Pecans, Almonds)
- 1 cup Dried Figs and Red Seedless Grapes
- 1 cup Candy Corn
- 1 package Puff Pastry
- 1/4 cup Raspberry Jam
- 1 Egg and Water (for the egg wash)
- 1 cup Candy Eyeballs
Directions
-
Preheat the Oven: Start by preheating your oven to 400°F (200°C). This temperature is ideal for baking your puff pastry, ensuring it becomes golden and flaky.
-
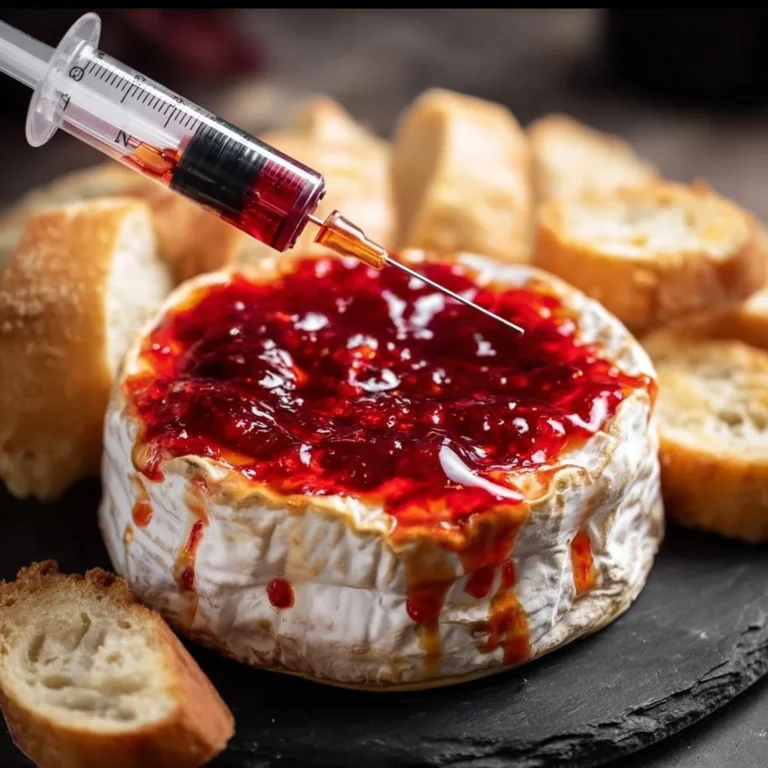
Prepare the Puff Pastry: On a floured surface, roll out the puff pastry until it’s about 1/4 inch thick. This will be the base for your brie cheese.
-
Add the Brie and Jam: Once your pastry is rolled out, place the brie cheese right in the center. Spread raspberry jam generously on top of the brie, adding a sweet hint to the creamy cheese.
-
Wrap the Brie: Carefully fold the pastry around the brie to create a sealed package. Make sure to seal the edges well. You can cut strips from the leftover pastry and wrap them around like a bandage to enhance the Halloween theme.
-
Brush with Egg Wash: In a small bowl, whisk one egg with a little water. Brush this mixture all over the puff pastry. Doing this gives the pastry that beautiful golden color as it bakes.
-
Bake: Bake the wrapped brie in the preheated oven for about 20-25 minutes or until it’s golden brown and puffed up.
-
Assemble the Cheese Board: While the brie is baking, take a large board or platter and start arranging your other ingredients. Cut the cheeses into appealing shapes or wedges and place them on the board. Scatter the peppered salami around.
-
Add the Crunchy Elements: Next, add whole wheat mini toasts and entertainment crackers. These will be perfect for serving cheese and jam.
-
Incorporate Additional Components: Now, sprinkle some cornichons around, and add black olives and fresh mozzarella balls for another layer of flavor.
-
Fruits, Nuts, and Sweets: Add seasonal fruits like pomegranate, Bosc pear slices, and blackberries. For crunchiness, sprinkle some praline pecans and almonds, then lay out dried figs and red seedless grapes. Finally, scatter around some candy corn to give your board that classic Halloween touch.
-
Include the Baked Brie: Once the brie is cooled slightly, add it to the cheese board. This melted cheese creates a beautiful focal point.
-
Serve: Provide toothpicks and small serving utensils alongside the board so everyone can easily help themselves.
How to Serve Ultimate Halloween Cheese Board
Serving your Ultimate Halloween Cheese Board is part of the fun! Place it in a well-lit area where guests can gather around and admire the setup. The board can be the centerpiece of your Halloween party, so make sure it’s at a comfortable height for everyone to reach.
When serving, encourage your guests to mix and match their snacks. They can pair different cheeses with crackers, meats, fruits, and nuts, or even add some of the raspberry jam for an extra zing. Using toothpicks allows for easy serving and adds to the casual, festive feel of the gathering.
Don’t forget to have some plates and napkins handy for guests to use as they sample their favorites. This becomes a social activity, as guests compare their choices and discover new combinations together.
How to Store Ultimate Halloween Cheese Board
If you happen to have leftovers, there are simple ways to store the ingredients.
- Cheese: Wrap any leftover cheese tightly in plastic wrap or place it in an airtight container. Most cheeses can stay fresh in the refrigerator for up to a week.
- Meat: The cured meats like peppered salami should also be stored in similar fashion, ensuring they are well-wrapped to maintain their flavor for a few days.
- Fruits and Nuts: Seasonal fruits may not last as long, so it’s best to consume those within a day or two. However, nuts can be kept in their containers, and they’ll stay fresh for weeks.
- Baked Brie: If there is any brie left, it can be stored in an airtight container in the fridge, but it’s best enjoyed fresh.
- Candy: Any leftover candy or sweets should be kept in a cool, dry place.
Creating a cheese board is more about the experience than strict recipes, and it’s okay to mix and match some ingredients based on what’s left after the party or what you enjoy.
Tips to Make Ultimate Halloween Cheese Board
-
Choose a Variety of Flavors: When creating your cheese board, aim for a variety of flavors. Combine sharp cheeses, creamy cheeses, and sweet elements like jams and fruits to create contrast in taste.
-
Add Color: Incorporate colorful fruits and nuts to add visual appeal. You can even use Halloween-themed decorations or props to enhance the festive atmosphere.
-
Arrange Thoughtfully: Take your time when arranging the board. Place larger items like cheese in the center, then use smaller snacks to fill in the gaps. Creating different textures and heights visually adds dimension.
-
Keep It Simple: You don’t have to overthink it. Just focus on using high-quality ingredients you love. The combination of flavors is what matters the most.
-
Consider Your Guests: Be mindful of any dietary restrictions or preferences your guests may have. It’s always good to have a balance between meats, cheeses, vegetarian options, and sweets.
Variation
There are many ways to customize the Ultimate Halloween Cheese Board to suit your style or theme. Here are some ideas you might consider:
- Cheese: Swap out any of the cheeses for seasonal or local ones. For instance, you can use pumpkin spice cheese in fall for an even more festive flair.
- Meats: Instead of salami, consider using prosciutto or turkey slices if your guests prefer a lighter option.
- Fruits: You could add pitted cherries or apples instead of or alongside the fruits listed.
- Extra Treats: For a spooky effect, use shaped cookies or Halloween-themed candies to replace or mix in with the candy corn.
Creating a cheese board is truly about what flavors you enjoy and what works for your gathering. Don’t hesitate to personalize it to fit your taste!
FAQs
-
Can I prepare the Ultimate Halloween Cheese Board ahead of time?
Yes! You can prepare most of the items ahead of time and set them up on the board an hour before serving. Cheese and meats will taste their best if arranged just before eating. -
What cheeses pair well together for a variety?
It’s great to balance sharp, creamy, and tangy flavors. A combination of hard cheeses like aged cheddar, soft cheeses like brie, and blue cheese works wonderfully. -
How do I choose fruits for the board?
Seasonal fruits are typically the freshest and most flavorful. Look for vibrant options like pears, pomegranates, and blackberries. A combination of sweet and tart fruits is ideal. -
Can I use store-bought items instead of homemade?
Absolutely! There’s no need to make everything from scratch. Store-bought jams, crackers, and even a pre-made baked brie can save time and still be delicious. -
How do I make it kid-friendly?
For a kid-friendly version, stick with mild cheeses, remove any strong-flavored ingredients, and swap the peppered salami with more familiar options like turkey or ham. Adding more sweets like chocolate and adjusting the fruits can also appeal to kids’ tastes.
Creating the Ultimate Halloween Cheese Board is an enjoyable way to merge flavors, creativity, and festivity. With simple ingredients and easy steps, you can create a delightful experience for any Halloween gathering. So gather your friends or family and get ready to indulge in this spooky snack spread that everyone will love!