Molten Red Velvet Cakes with Creamy Topping
why make this recipe
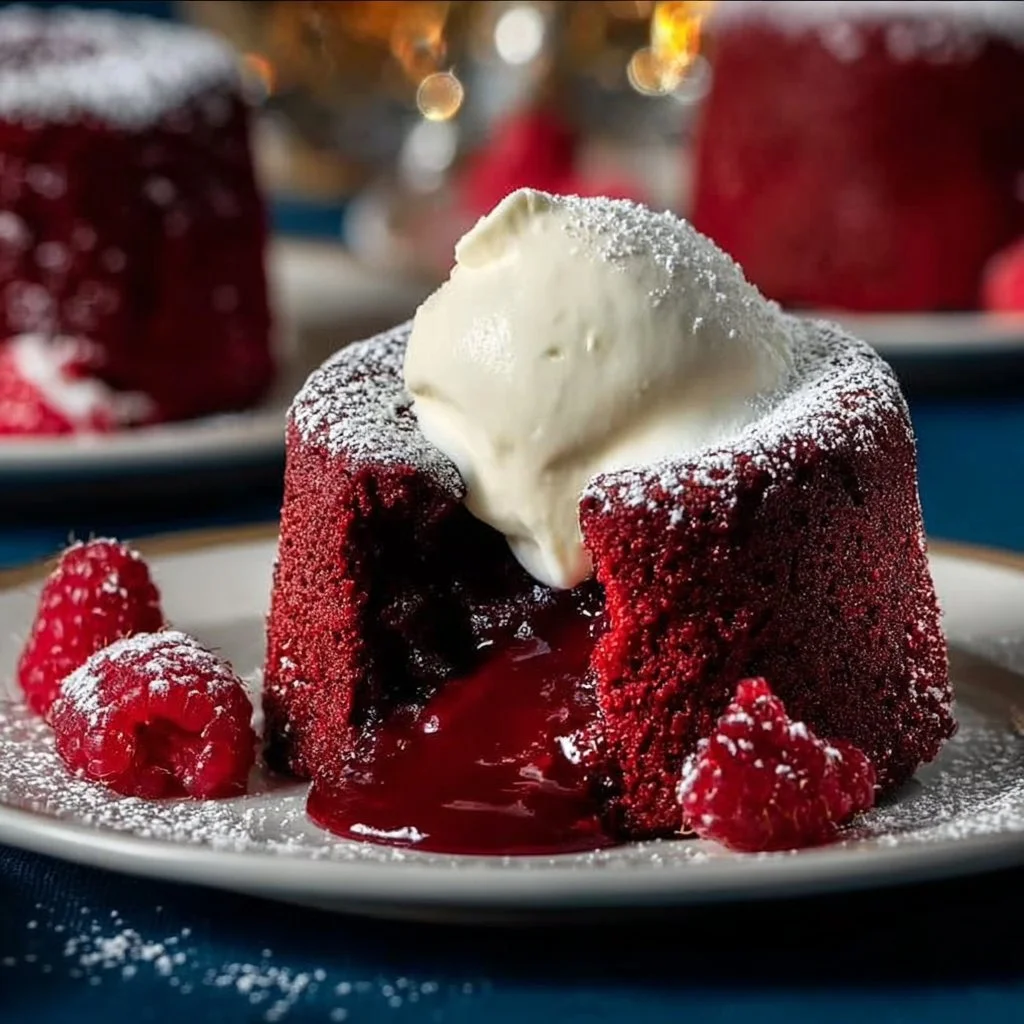
Molten Red Velvet Cakes with Creamy Topping are more than just a dessert; they’re a delightful experience. Imagine cutting into a beautiful red cake, only to have a warm, gooey center flow out. This dessert combines the rich flavors of red velvet, chocolate, and cream cheese, making it perfect for any occasion. Whether you’re celebrating a special day or simply want to treat yourself, these cakes will impress anyone who takes a bite.
Baking these molten cakes is an excellent way to showcase your skills and creativity in the kitchen. They are surprisingly easy to make and offer a wonderful way to introduce a classic cake flavor in a new format. The rich red color adds a festive touch, making these cakes perfect for holidays, celebrations, or dinner parties.
In addition to being delicious, this recipe also allows you to play around with different flavors and ingredients. If you love experimenting in the kitchen, this molten cake recipe is a great canvas for your creativity. Not only does it taste amazing, but it also looks stunning on any plate.
how to make Molten Red Velvet Cakes with Creamy Topping
Making Molten Red Velvet Cakes with Creamy Topping is an enjoyable experience that can turn your kitchen into a little slice of heaven. Follow this step-by-step guide, and you’ll have these delightful cakes ready to impress your family and friends!
Ingredients
To get started, here’s what you will need:
- 4 oz Semisweet chocolate baking bar (finely chopped)
- 1/2 cup Heavy cream
- 1/2 cup Cake flour
- 2 tbsp Unsweetened cocoa (plus extra for dusting)
- 1 tsp Baking soda
- 1/4 tsp Salt
- 1/4 cup Salted butter (melted)
- 1/2 cup Granulated sugar
- 1/4 cup Buttermilk
- 1 tbsp Red liquid food coloring
- 1 tsp Vanilla extract
- 1 tsp Apple cider vinegar
- 1 large Egg yolk
- 4 oz Cream cheese (softened)
- 1/4 cup Powdered sugar
- 1 tsp Vanilla extract (for topping)
- 1/2 cup Heavy cream (whipped, for topping)
Directions
Now that you have everything, let’s dive into the process of creating these molten cakes!
-
Preheat the oven: Begin by preheating your oven to 425°F (220°C). Grease four ramekins with butter, then dust them with cocoa powder. This ensures the cakes will easily release after baking.
-
Melt the chocolate: In a microwave-safe bowl, combine the chopped semisweet chocolate and 1/2 cup of heavy cream. Microwave the mixture in 30-second intervals, stirring between each interval until it is smooth and well blended.
-
Mix dry ingredients: In a separate bowl, whisk together the cake flour, unsweetened cocoa powder, baking soda, and salt. Make sure there are no lumps; the mixture should be well combined.
-
Prepare the wet mixture: In another bowl, mix the melted salted butter with granulated sugar until blended. Next, add the buttermilk, red liquid food coloring, vanilla extract, apple cider vinegar, and the egg yolk. Stir this mixture until it is smooth.
-
Combine wet and dry ingredients: Gradually add the dry ingredient mixture to the wet mixture. Just add a little bit at a time to prevent clumps. Finally, add the melted chocolate mixture. Be careful not to overmix; a few small lumps are okay.
-
Fill ramekins: Divide the batter evenly among the greased ramekins, filling them about 3/4 full. This will help create the molten center when they bake.
-
Bake the cakes: Place the filled ramekins on a baking sheet and bake in the preheated oven for 12-15 minutes. The edges should be firm, but the center should remain soft.
-
Cooling and unmolding: Once baked, let the cakes cool for 1-2 minutes in the ramekins. Then, carefully run a knife around the edges, and invert them onto plates to unmold. They should come out easily thanks to the butter and cocoa dusting.
-
Make the creamy topping: In a mixing bowl, beat the softened cream cheese until it is smooth. Gradually add the powdered sugar and vanilla extract. Carefully fold in the whipped cream until the mixture is fluffy and well combined.
-
Serve the cakes: Serve the warm molten red velvet cakes immediately with a generous scoop of creamy topping on each.
how to serve Molten Red Velvet Cakes with Creamy Topping
The presentation of your molten red velvet cakes is just as crucial as their flavor. To serve, place the inverted cakes gently on dessert plates. As you place the creamy topping on each cake, ensure that it sits prominently atop the warm dessert.
You can enhance the visual appeal by drizzling a bit of chocolate or raspberry sauce around the plate for added color and flavor. A sprinkle of cocoa or powdered sugar gives a finishing touch that makes the dish look restaurant-worthy.
Consider garnishing each serving with a few fresh berries or mint leaves to add a touch of freshness. This not only enhances the taste but also makes for a beautiful presentation. For gatherings or special occasions, serve them with a side of vanilla ice cream to complement the richness of the warm cake.
how to store Molten Red Velvet Cakes with Creamy Topping
Storing these cakes can be challenging since they taste best when served fresh. However, if you have leftovers or want to prepare them in advance, here’s how to do it:
-
Storing baked cakes: Let the cakes cool completely in the ramekins. Once cooled, you can cover them with plastic wrap or foil and store them in the refrigerator for up to 2 days. Note that the molten center may not be as runny when reheated.
-
Reheating: To enjoy leftover cakes, preheat your oven to 350°F (175°C). Place the ramekins in the oven for about 10 minutes until warmed through.
-
Creamy topping storage: The creamy topping can be stored separately in an airtight container in the fridge. It’s best to use it within 2-3 days for the freshest taste.
tips to make Molten Red Velvet Cakes with Creamy Topping
-
Quality Ingredients: Use high-quality chocolate and fresh butter for the best flavor. The taste of this dessert largely depends on the quality of its ingredients.
-
Avoid Overmixing: When combining wet and dry ingredients, mix just enough to incorporate everything. Overmixing can lead to dense cakes instead of light, molten ones.
-
Room Temperature Ingredients: Make sure your eggs and cream cheese are at room temperature before you begin. This helps in achieving a smoother batter and a better texture in the final cake.
-
Ramekins: If you don’t have ramekins, you can use muffin tins, but the baking time may need to be adjusted. Ensure you grease the tins well to prevent sticking.
-
Watch Baking Time: Every oven is different, so keep an eye on the cakes while baking. You want the edges to appear set while keeping the centers soft.
variations
While the classic molten red velvet cake is delicious on its own, there’s always room to get creative.
-
Chocolate Variations: You can add chocolate chips to the batter for an extra chocolatey experience. They’ll melt within the cake and enhance the molten center.
-
Nutty Addition: Incorporate finely chopped nuts like pecans or walnuts into the batter for added crunch and flavor. Just be cautious with the amount, as you don’t want to overpower the cake.
-
Fruit Enhancement: Consider adding a layer of fresh raspberries or sliced strawberries in the center before baking. This gives a fruity surprise within each bite.
-
Flavored Cream: Instead of classic whipped cream, you can flavor your topping with a splash of almond extract or even a hint of espresso for a coffee twist.
FAQs
1. Can I make these cakes ahead of time?
Yes, you can prepare the batter ahead of time and store it in the refrigerator. When you’re ready to bake, simply pour the batter into greased ramekins and bake as directed without needing to mix again.
2. What happens if I overbake the cakes?
If you overbake the molten cakes, they may become more like a cupcake with a firmer texture and will lose their gooey center. It’s important to monitor the baking time closely for the best results.
3. Can I freeze these cakes?
Yes, you can freeze the baked cakes. Let them cool completely before wrapping them in plastic wrap and placing them in a freezer-safe container. They can be stored this way for up to a month. Just thaw them in the refrigerator before reheating.
4. Can I make a larger cake instead of individual portions?
Yes, you can bake the batter in a larger cake pan, but you’ll need to adjust the baking time. A larger cake may take longer to bake, so keep an eye on it, testing for doneness in the center.
5. What’s the best way to serve these cakes?
Serve the cakes warm with a dollop of creamy topping and perhaps a scoop of ice cream for a delightful contrast of temperatures. A garnish of fresh berries or a drizzle of chocolate sauce enhances both taste and presentation.
Enjoy making this indulgent dessert, and let every bite bring joy to you and your loved ones!