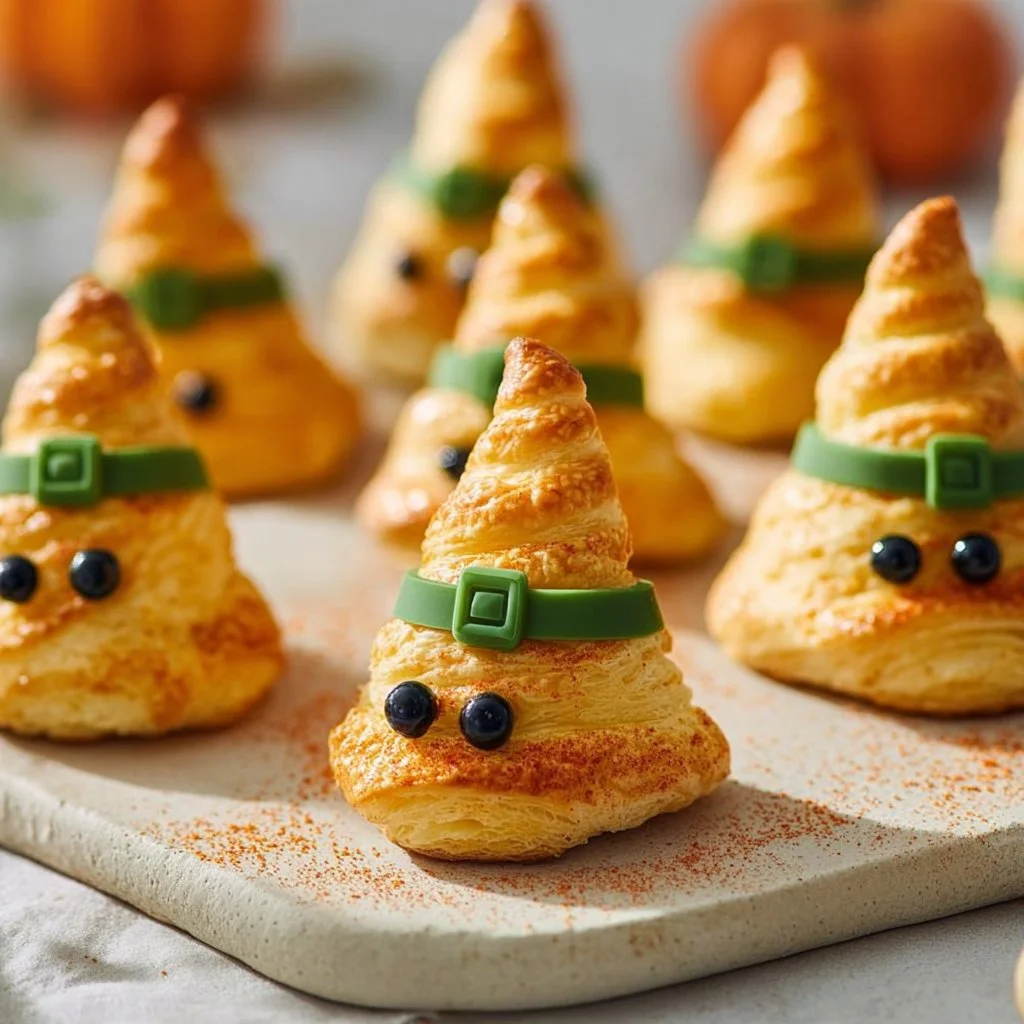
Cheesy Witch Hat Crescents
Why Make This Recipe
Cheesy Witch Hat Crescents are a fun and simple treat perfect for Halloween parties, spooky movie nights, or school celebrations. They combine the deliciousness of cheesy goodness with a whimsical design that captures the spirit of the season. Kids and adults alike love them, making them a hit at any gathering. Plus, they are easy to make and require minimal ingredients, which means you can whip them up quickly. The combination of crescent dough and melted cheese creates a delightful texture that everyone will enjoy. Adding slices of black olives as decoration not only enhances the fun appearance but also gives a savory bite. This recipe is not just about taste; it’s about creating an experience. A little creativity in the kitchen can bring smiles and spark joy.
How to Make Cheesy Witch Hat Crescents
Making Cheesy Witch Hat Crescents is easy and fun! You can involve your kids in the cooking process, making it a great activity for family bonding. Here’s how to do it step-by-step.
Ingredients
- 1 can refrigerated crescent roll dough
- 1 cup shredded cheese (such as cheddar or mozzarella)
- Black olives (for decoration)
- Cooking spray or butter (for greasing)
Directions
-
Preheat the oven according to the crescent roll dough package instructions. This usually means setting it to about 375°F (190°C) or whatever the package suggests. Preheating the oven ensures that your crescents will bake evenly and become nice and golden brown.
-
Roll out the crescent roll dough on a clean surface. If you want, you can lightly dust the surface with flour to prevent sticking. Unroll the dough carefully, making sure not to tear it. The dough should come in a rectangular shape.
-
Cut the dough into triangles. You should see pre-cut lines on the dough which makes this part easier. If your dough doesn’t have lines, simply cut each rectangle into two triangles. The larger the triangles, the bigger the hats will be.
-
Place a generous amount of shredded cheese at the wide end of each triangle. Normally, about a tablespoon or so will do, but you can adjust based on how cheesy you like your crescents!
-
Now, roll the triangles up from the wide end to the tip. Make sure to wrap tightly so that the cheese stays inside. This step is what gives the crescent its classic shape.
-
Place the rolled-up crescents on a greased baking sheet. Use cooking spray or butter for greasing to prevent sticking. Leave some space between each crescent, as they will expand while baking.
-
Bake according to the package directions, usually around 10-12 minutes, or until they are golden brown. Keep an eye on them because ovens can vary, and you want them perfectly baked.
-
Once they are done and cooled a little, it’s time to add the finishing touch. Slice black olives into small rounds and place a slice at the tip of each crescent to represent the buckle of the witch hat. This will add a nice contrast to the yellow cheese and make them look even more festive.
-
Serve warm and enjoy your spooky celebration! These are best eaten right out of the oven, but they can be enjoyed later as well.
How to Serve Cheesy Witch Hat Crescents
These Witch Hat Crescents are best served warm and fresh from the oven. A great idea is to serve them on a themed platter to enhance the Halloween spirit. You can place them next to a small bowl of marinara sauce or ranch dressing for dipping, adding another layer of flavor. Consider garnishing the serving plate with some fake spider webs or Halloween-themed decorations to make the presentation look even more festive.
If you’re serving them at a party, try making a fun Halloween label for the dish, such as “Witch’s Hats” or “Spooky Crescents.” This can help create excitement and intrigue among your guests.
How to Store Cheesy Witch Hat Crescents
If you happen to have leftovers (which is rare with these delicious treats!), you should store them properly to keep them fresh. Allow the crescents to cool completely before placing them in an airtight container. This helps prevent moisture build-up, which can make them soggy.
You can store Cheesy Witch Hat Crescents in the fridge for up to 3 days. When you’re ready to eat them again, reheat them in the microwave for about 20-30 seconds or use an oven set at 350°F (175°C) for 5-10 minutes to warm them back up. Just make sure they don’t get overcooked, as you want to maintain that nice cheese melt.
Tips to Make Cheesy Witch Hat Crescents
-
Cheese Choices: While shredded cheddar or mozzarella works great, feel free to experiment with other cheese varieties like pepper jack for some extra spice or gouda for a smoky flavor.
-
Dough Variation: You can try using different types of crescent dough, like whole wheat or flaky biscuits, for a unique twist.
-
Decorate Creatively: Get fun with your decorations! Try using different shapes and sizes of olives or even using other toppings like candy corn or pretzels to make it more whimsical.
-
Spice It Up: If you like a kick, consider adding some jalapeños or your favorite spices to the cheese before rolling it up.
-
Double the Recipe: If you’re having a large gathering, don’t hesitate to double or even triple the recipe. These crescents are bound to be a crowd-pleaser!
Variation
You can also add other fillings to make these crescents even more exciting. For example, consider adding cooked bacon bits, diced bell peppers, or even pepperoni inside the cheese before rolling. If you’re going for a vegetarian option, adding spinach or artichokes can amp up the flavor and nutrition.
Another fun variation is to use puff pastry instead of crescent roll dough. This will give a flakier texture and slightly different taste, but it can be just as delightful.
FAQs
1. Can I make Cheesy Witch Hat Crescents ahead of time?
Yes! You can prepare the crescents by rolling them and placing them on the baking sheet, then cover them with plastic wrap and refrigerate them for up to 24 hours. When you are ready to bake, just pop them in the oven straight from the fridge; you may need to add a couple of extra minutes to the baking time.
2. Can I freeze Cheesy Witch Hat Crescents?
Yes, you can freeze them! After baking, let them cool completely, then store them in an airtight container or freezer bag. They can last in the freezer for up to 2 months. To reheat, let them thaw overnight in the fridge, then warm them in the oven or microwave.
3. What can I substitute for black olives?
If you’re not a fan of black olives, you can use other toppings like small pieces of green peppers, cherry tomatoes, or even tiny pieces of cheese for decoration. Just be sure that they can stick well to the crescent tip.
4. Are these crescents suitable for kids with food allergies?
Depending on the ingredients you choose, you can adjust this recipe to be allergy-friendly. For instance, use dairy-free cheese for those with dairy allergies. However, always check the packaging for potential allergens when using pre-made products like crescent roll dough.
5. How can I make these crescents without using ready-made dough?
If you prefer to make everything from scratch, you can create your own dough using flour, butter, yeast, and salt. There are many simple recipes for dough that can yield a fluffy texture. However, using store-bought dough is much quicker and easier, especially for a fun holiday treat.
Creating Cheesy Witch Hat Crescents is not just about the taste but also about bringing joy to your home. This easy recipe allows you to enter into the spirit of Halloween fun while enjoying the simple pleasures of cooking together. Enjoy making and sharing this delightful treat with friends and family!