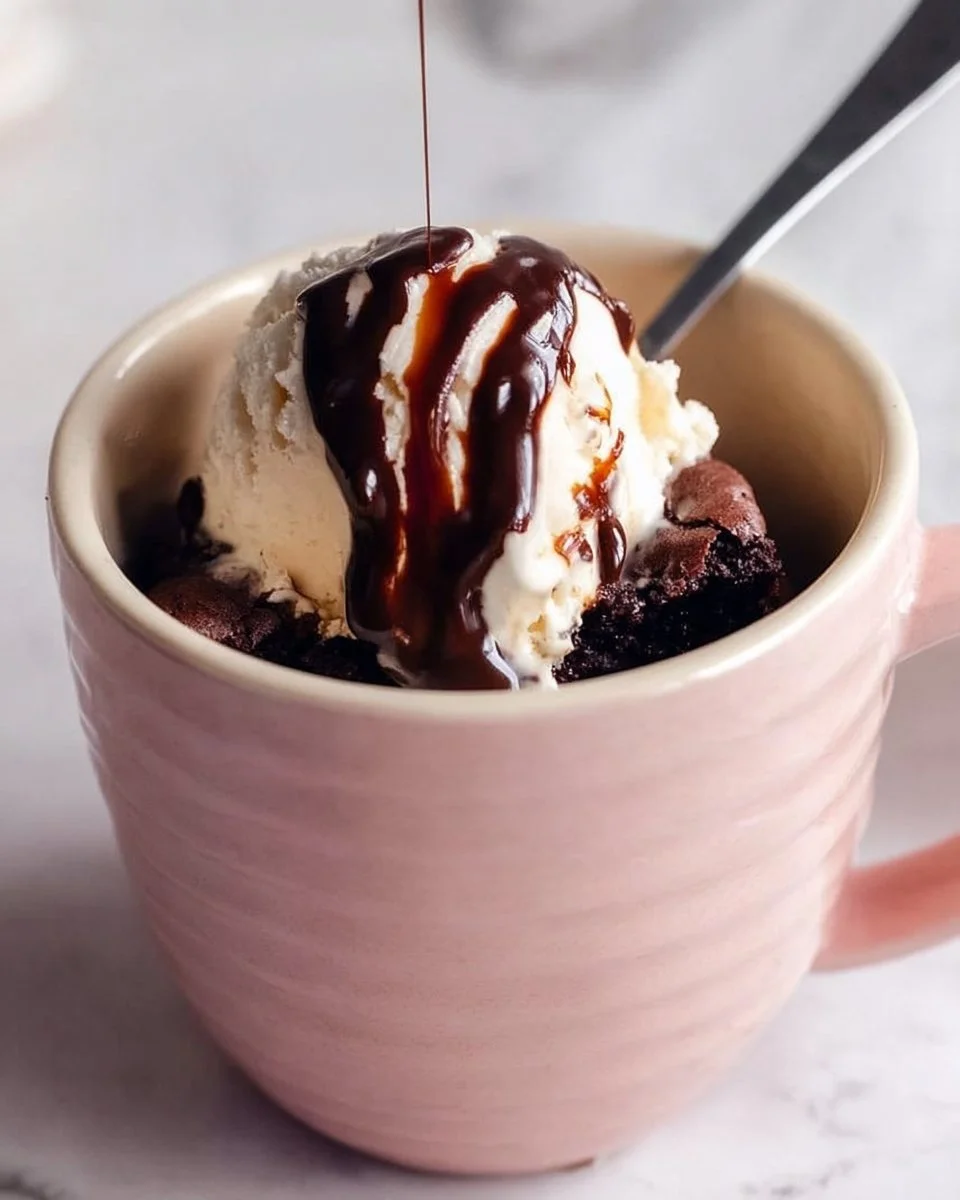
Chocolate Mug Brownie
Why Make This Recipe
There are many reasons to try making a Chocolate Mug Brownie. First and foremost, it’s an incredibly quick dessert that you can whip up in just a few minutes. Whether you’re craving something sweet after dinner or need a late-night snack, this recipe is perfect for satisfying those chocolate cravings.
The Chocolate Mug Brownie is also flexible. You can enjoy it as is, or you can customize it by adding chocolate chips, nuts, or even a scoop of ice cream on top. It requires only a few ingredients that you likely already have in your kitchen, making it an accessible treat for anyone. Plus, there’s no need to turn on the oven or deal with a baking pan—everything is done in a single mug!
Whether you’re a student living in a dorm, a busy professional, or just someone looking for a quick sweet fix, this recipe is ideal. It’s perfect for solo snacking but can also be a fun activity to do with kids. They will enjoy the simple process and watching their creation cook in the microwave. This makes it not just a delicious treat but also a fun dessert-making experience.
How to Make Chocolate Mug Brownie
Making a Chocolate Mug Brownie is very simple. You only need to follow a few easy steps, and you’ll have a warm, gooey brownie ready to be enjoyed in no time.
Ingredients
To make a delightful Chocolate Mug Brownie, gather the following ingredients:
- 1/4 cup all-purpose flour
- 1/4 cup granulated sugar
- 2 tablespoons unsweetened cocoa powder
- 1/8 teaspoon salt
- 1/4 cup water
- 2 tablespoons vegetable oil
- 1/4 teaspoon vanilla extract
- Optional: chocolate chips or nuts
Directions
-
Combine Dry Ingredients: Start by taking a microwave-safe mug and combine the all-purpose flour, granulated sugar, cocoa powder, and salt. Use a fork or a small whisk to mix these ingredients well. This helps to remove any lumps and ensures a smooth brownie.
-
Add Wet Ingredients: Next, pour in the water, vegetable oil, and vanilla extract into the dry mix. Stir these together until the mixture is smooth and well blended. Be sure there are no dry pockets left in the mixture.
-
Optional Additions: If you want to enhance your brownie, you can mix in chocolate chips or nuts at this stage. This adds extra flavor and texture to your treat.
-
Microwave It: Place the mug in the microwave and cook on high for about 1 minute. Keep an eye on it and check at the 50-second mark to see if it’s done. The brownie is ready when it has set in the center and is no longer wet.
-
Cool and Enjoy: After microwaving, carefully remove the mug (it will be hot!). Let it cool for a few minutes before diving in. This waiting period allows the brownie to finish setting and prevents you from burning your mouth.
How to Serve Chocolate Mug Brownie
Serving the Chocolate Mug Brownie is just as easy as making it. Once the brownie has cooled for a few minutes, you can enjoy it straight from the mug. However, if you’d like to elevate your dessert experience, consider these serving ideas:
-
A Scoop of Ice Cream: Add a scoop of vanilla or chocolate ice cream on top of the warm brownie. The contrast of the hot brownie and cold ice cream is delicious.
-
Drizzle with Chocolate Sauce: For chocolate lovers, a drizzle of chocolate sauce can be the perfect finishing touch.
-
Whipped Cream: A dollop of whipped cream on top adds a light and fluffy texture, complementing the rich brownie.
-
Fresh Berries: To balance out the sweetness, you can add fresh berries like raspberries or strawberries on the side. Their tartness provides a nice contrast to the chocolatey flavor.
These simple serving suggestions will make your Chocolate Mug Brownie feel more special, perfect for impressing guests or treating yourself.
How to Store Chocolate Mug Brownie
If you find yourself with leftover Chocolate Mug Brownie (though it’s hard to resist it all in one sitting!), you may want to store it for later. Here’s how you can do so:
-
Room Temperature: The brownie can be kept at room temperature for a day. Just cover the mug or transfer it to an airtight container to keep it fresh.
-
Refrigeration: For longer storage, place the brownie in the fridge. It will stay good for up to three days. Make sure to cover it well to prevent it from drying out.
-
Reheating: When you’re ready to enjoy the brownie again, simply microwave it for about 15-20 seconds to warm it up. If you’ve topped it with ice cream or whipped cream, you might want to add a fresh layer when you reheat it.
By storing it correctly, you can savor this delightful treat even after your initial indulgence.
Tips to Make Chocolate Mug Brownie
While this recipe is quite straightforward, here are some tips to ensure your Chocolate Mug Brownie turns out perfectly every time:
-
Use a Large Mug: Make sure you’re using a large enough mug to prevent overflow while cooking. A 12-ounce mug is often a good size.
-
Mix Well: Mixing the ingredients thoroughly helps achieve a smooth brownie. Take your time to ensure everything is well incorporated, especially with the dry ingredients.
-
Adjust Microwave Time: Each microwave is different, so keep an eye on the mug brownie as it cooks. If it’s not set after one minute, you can continue to microwave it in 10-second intervals.
-
Try Different Flavors: Feel free to experiment with flavors! You can substitute vanilla extract with almond extract for a different dimension. You could also add a teaspoon of coffee for a deeper chocolate flavor.
-
Add Spices: If you’re feeling adventurous, consider adding a pinch of cinnamon or a dash of cayenne pepper for a unique twist.
These tips will help you make an even better Chocolate Mug Brownie that suits your personal taste.
Variation: Peanut Butter Chocolate Mug Brownie
For those who love the combination of chocolate and peanut butter, here’s a quick variation to try:
- Peanut Butter Surprise: Before microwaving, drop a tablespoon of peanut butter in the center of the brownie mixture. When cooked, you’ll have a gooey peanut butter center that complements the chocolate perfectly.
This variation is just one of many ways you can change up the basic recipe to suit your flavor desires. Feel free to get creative!
FAQs
1. Can I make this brownie without a microwave?
Yes, you can make the Chocolate Mug Brownie in an oven! Preheat your oven to 350°F (175°C). Prepare the batter in an oven-safe ramekin, and bake for about 15-20 minutes, or until set in the center.
2. Can I use whole wheat flour instead of all-purpose flour?
Yes, you can substitute whole wheat flour for all-purpose flour, but the texture might be a bit denser. If you prefer a lighter brownie, consider a half-and-half mix of both flours.
3. How can I reduce the sugar in the recipe?
If you want to cut down on sugar, feel free to reduce the granulated sugar by about half. You may also try using a sugar substitute, but make sure to follow the conversion guidelines on the package for best results.
4. Can I add other flavors?
Absolutely! You can add flavors like peppermint extract, almond extract, or even a touch of orange zest for a fruity twist. Experimenting with flavors can personalize your brownie exactly to your liking.
5. Is it possible to make a bigger batch?
While this recipe is designed for one serving to be made in a mug, you can multiply the ingredient amounts and bake in a larger dish. Just make sure to adjust the baking or microwaving time accordingly.
By answering these common questions, you can enjoy making and eating your Chocolate Mug Brownie even more. Happy baking!