
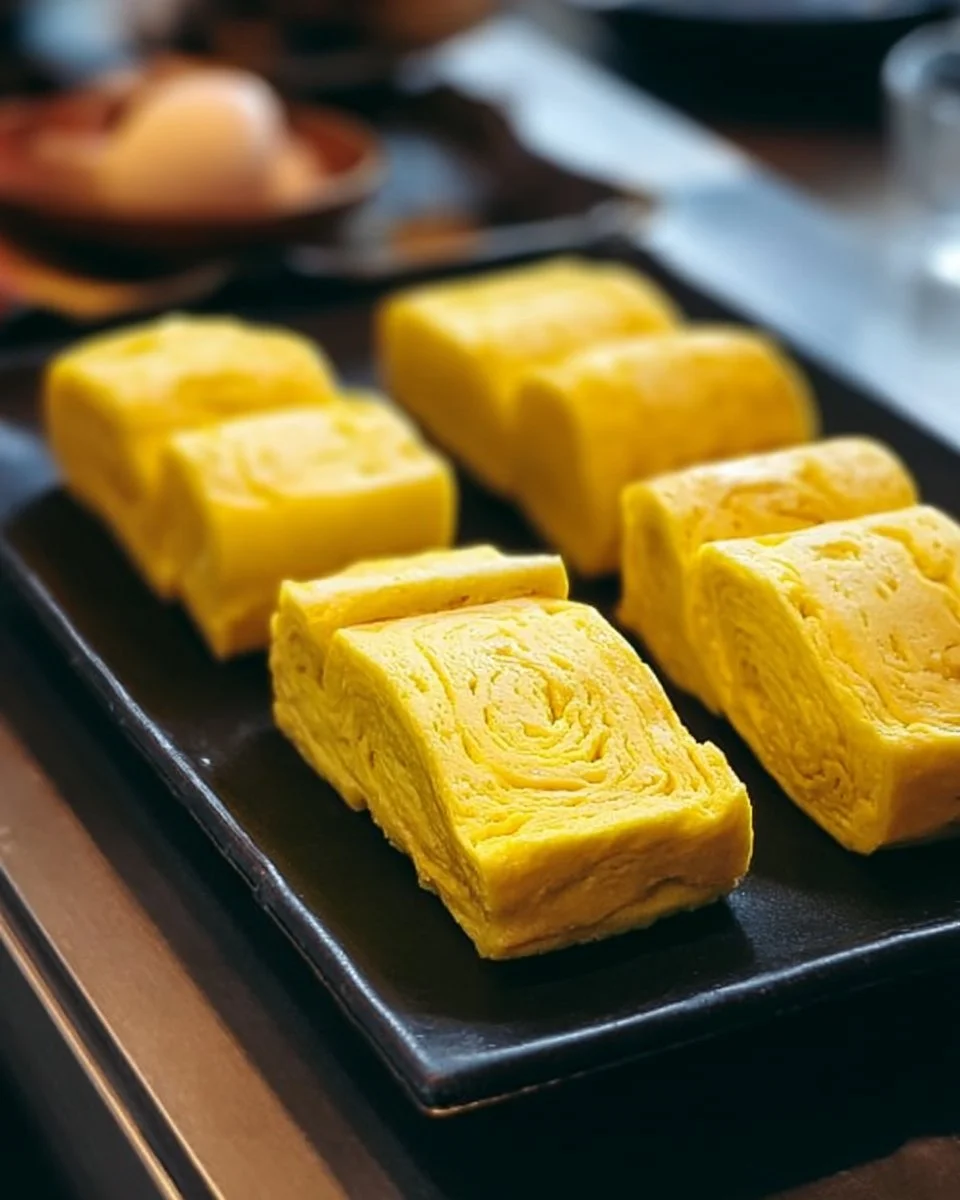
Perfect Tamagoyaki
why make this recipe
Tamagoyaki, the delightful Japanese rolled omelette, is more than just a breakfast item; it’s a cultural staple that brings warmth and comfort to the table. It showcases the beauty of simplicity and the art of cooking. There are numerous reasons to make the perfect tamagoyaki at home. First, it’s a unique dish that can brighten up any meal, whether it’s breakfast, lunch, or dinner. It can also be an interesting addition to a bento box, making it both attractive and delicious.
Another reason to try this recipe is that it allows you to practice and develop your culinary skills. Making tamagoyaki requires technique — it’s about control of the heat and the timing, making it a challenging yet fulfilling dish to master. Creating beautifully rolled layers can boost your confidence in the kitchen.
Moreover, tamagoyaki is a dish that can be customized to fit your taste. You can experiment with various fillings and seasonings to add your personal touch. Plus, it is packed with protein, making it a nutritious option for you and your family.
Finally, sharing homemade tamagoyaki with friends or family can create joyful moments and memories. The process of making and serving this dish can bring people together, fostering a sense of community and tradition.
how to make Perfect Tamagoyaki
Making perfect tamagoyaki is not as complicated as it may seem. With some practice and patience, you can create this delicious dish at home. Here are the ingredients and step-by-step directions.
Ingredients
- 3 units Eggs
- 2 tablespoons Water
- 0.5 teaspoon Salt
- 2 teaspoons Sugar
- 1 tablespoon Vegetable Oil
Directions
-
Prepare the egg mixture: In a bowl, crack the fresh eggs and add the water, salt, and sugar. Whisk until smooth. Make sure there are no lumps, as a smooth mixture will yield a better texture in the finished omelette.
-
Heat the pan: Heat a tamagoyaki pan over medium-low heat. If you don’t have a tamagoyaki pan, a small non-stick skillet can work, but the traditional pan is designed to help achieve the perfect shape. Once the pan is heated, coat the bottom with vegetable oil using a paper towel or brush to spread the oil evenly.
-
Cook the first layer: Pour a thin layer of the egg mixture into the pan. Make sure it covers the bottom evenly. Cook until the edges start to set but the middle is still slightly runny.
-
Roll the omelette: Gently roll the omelette from one edge to the other. Use chopsticks or a spatula to help you roll it. The goal is to create a tight roll, so be gentle but firm.
-
Add more egg mixture: After rolling the first layer, add more egg mixture to the pan. Lift the rolled omelette slightly to let the raw egg flow underneath. This step helps create layers in your tamagoyaki. Cook until the edges set again.
-
Repeat the process: Continue the rolling and adding process with the remaining egg mixture until it is all cooked. Aim for a nicely layered, thick omelette.
-
Remove and let cool: Once done, remove the tamagoyaki from the pan. Lay it on a cutting board and let it cool for a few minutes before slicing into pieces.
-
Serve as desired: Tamagoyaki can be enjoyed warm or cold. Arrange the slices on a plate, and it’s ready to serve!
how to serve Perfect Tamagoyaki
Serving tamagoyaki is quite simple, but there are a few tips to enhance its presentation and taste. You can serve it sliced into thick or thin pieces, depending on your preference. A classic way to enjoy it is to place the slices on a plate, possibly garnished with some finely chopped green onions or a sprinkle of bonito flakes for an extra touch of flavor.
Tamagoyaki is also a wonderful addition to a bento box. You can arrange the slices alongside rice, pickles, and vegetables for a balanced meal. Another delicious way to serve tamagoyaki is drizzled with a light soy sauce or a tad bit of sweet teriyaki sauce.
For an authentic experience, you might consider pairing it with steamed rice, miso soup, and some fresh vegetables. This combination makes for a wholesome meal that showcases the flavors of simplicity and tradition.
how to store Perfect Tamagoyaki
Storing tamagoyaki correctly is essential to maintain its flavor and texture. If you have leftovers or make a larger batch, here’s how to store it properly:
-
Cooling: First, let the tamagoyaki cool completely at room temperature. Avoid refrigerating it while it is hot, as this can create condensation and make it soggy.
-
Wrapping: Once cooled, wrap the tamagoyaki tightly in plastic wrap or place it in an airtight container. This helps keep it fresh by preventing air exposure.
-
Refrigeration: Store the wrapped tamagoyaki in the refrigerator if you plan to eat it within a few days. Typically, it lasts for about 3 to 5 days in the fridge.
-
Freezing: If you want to keep it for a longer period, tamagoyaki can be frozen. Slice it and place it in a single layer on a baking sheet before transferring it to a freezer-safe bag or container. Ensure to remove as much air as possible before sealing. It can be frozen for up to a month.
-
Reheating: When you are ready to eat the tamagoyaki, reheat it gently in a microwave or pan over low heat until warmed through.
Keeping your tamagoyaki fresh will allow you to enjoy its delightful taste even days after preparing it.
tips to make Perfect Tamagoyaki
To achieve the perfect tamagoyaki, consider these handy tips:
-
Use Fresh Eggs: The quality of the eggs can significantly affect the flavor and texture of your tamagoyaki, so always opt for fresh, high-quality eggs.
-
Control the Heat: Keep the heat at medium-low. Too high of a temperature can cause the egg to cook too quickly, resulting in a dry omelette. Patience is key to getting the texture just right.
-
Thin Layers: Pour a thin layer of the egg mixture into the pan at a time. Thinner layers cook more evenly and make it easier to roll.
-
Practice Rolling: The rolling technique may take time to perfect. Don’t worry if the first few tries don’t turn out perfectly — practice makes perfect! The more you make it, the better you will get.
-
Experiment with Ingredients: Feel free to customize your tamagoyaki with other ingredients like green onions, mushrooms, or cheese for different flavors. However, keep the base mixture simple to let the tamagoyaki shine.
-
Keep a Clean Pan: After each layer, wipe the pan to keep it clean and to prevent any previously cooked edges from sticking into your next layer.
variation
While tamagoyaki is delicious as is, there are various variations you can explore. Here are a few:
-
Dashi Tamagoyaki: Adding dashi (Japanese soup stock) to the egg mixture adds depth and umami flavor. This is a popular variation that enhances the traditional taste.
-
Savory Versions: You can incorporate chopped vegetables like spinach, carrots, or bell peppers to add color and nutrition.
-
Sweet Versions: Some people enjoy a sweeter tamagoyaki by increasing the sugar content. You can even add a hint of vanilla for a unique flavor profile.
-
Cheese Tamagoyaki: For a Western twist, some people include shredded cheese within the layers, adding creaminess to the dish.
By playing around with these variations, you can create a tamagoyaki that is uniquely suited to your taste preferences.
FAQs
1. Can I use regular frying pans for tamagoyaki?
Yes, while a tamagoyaki pan is designed specifically for this dish, a regular non-stick frying pan can work as well. Just ensure it’s small enough to make the rolling easier.
2. Can I make tamagoyaki in advance?
Absolutely! You can make tamagoyaki in advance and store it in the refrigerator for up to five days or freeze it for longer storage. Just remember to reheat it gently for the best texture.
3. Is tamagoyaki healthy?
Yes, tamagoyaki can be a healthy dish, especially if you use fresh and nutritious ingredients. It’s high in protein from the eggs and can be balanced with various toppings or sides.
4. Can I use different flavors in my tamagoyaki?
Yes! Tamagoyaki is a versatile dish. Feel free to experiment with different ingredients such as vegetables, herbs, spices, or even cheese to create your own flavorful versions.
5. How can I make sure my tamagoyaki is fluffy?
To achieve a fluffy texture, whisk the egg mixture well until it’s fully combined and slightly frothy. Additionally, cooking at the right temperature and adding water or dashi to the mixture can create a lighter texture.
With these instructions, tips, and variations, you are well-equipped to embark on the journey of creating the perfect tamagoyaki. Whether enjoyed as a simple breakfast or a delightful addition to a meal, mastering tamagoyaki will enhance your culinary skills and enrich your appreciation for this beloved dish. Enjoy the process and the deliciousness that follows!