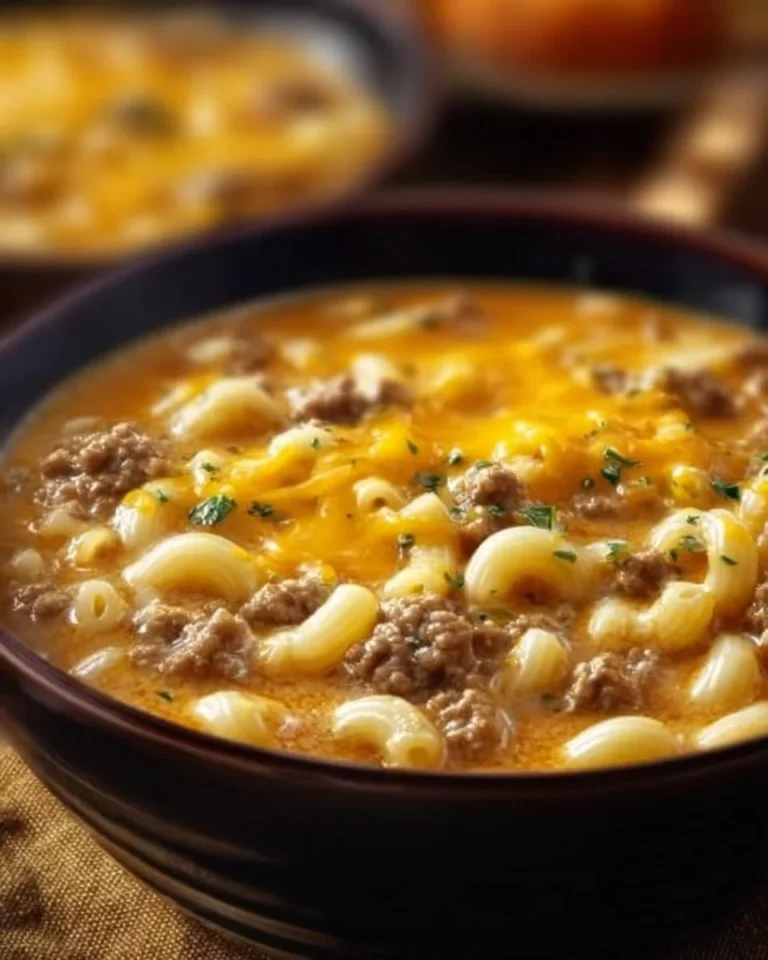
Rib Cage Mac & Cheese
Why Make This Recipe
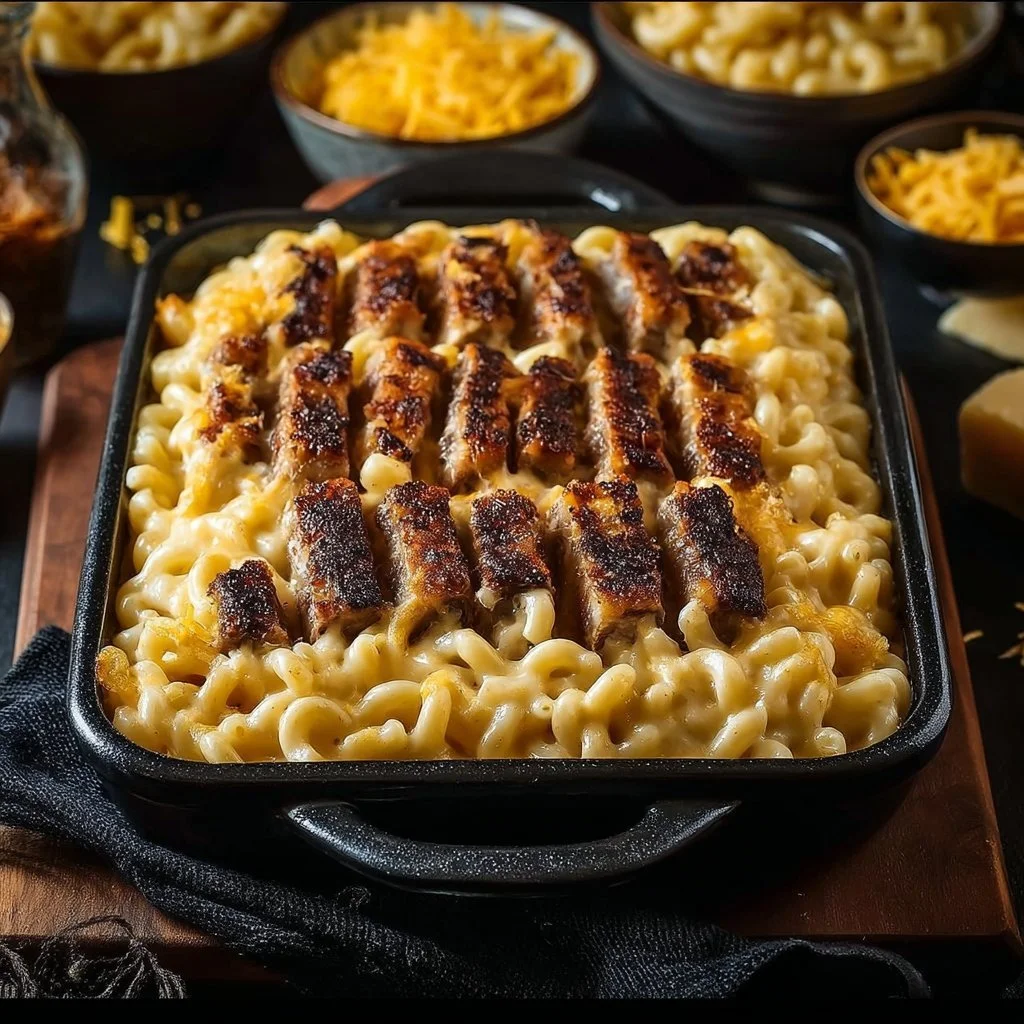
Rib Cage Mac & Cheese is not your ordinary macaroni and cheese. It takes the comforting classic dish and transforms it into something fun and creative. If you’re looking for an eye-catching and delicious meal that will wow your family or friends, this dish is a perfect choice. The unique rib cage structure made from crescent roll dough adds a playful visual, making it perfect for parties or special occasions. The cheesy goodness with the golden-brown crust will satisfy kids and adults alike.
This recipe combines simple ingredients to create a rich, creamy cheese sauce that perfectly coats the elbow macaroni. It’s straightforward and doesn’t take much time to prepare. Plus, using crescent roll dough adds a delightful twist that elevates this dish. If you want comfort food that also sparks joy, Rib Cage Mac & Cheese is a must-try!
How to Make Rib Cage Mac & Cheese
Making Rib Cage Mac & Cheese is a rewarding process that involves a few simple steps. Below is a detailed guide on how to prepare this delightful dish, ensuring that you get every step right.
Ingredients:
- 8 oz Elbow Macaroni
- 2 cups Cheddar Cheese, shredded
- 1 cup Milk
- 4 tbsp Butter
- 2 tbsp Flour
- 1 cup Bread Crumbs
- 1 can Crescent Roll Dough
- 1 tsp Salt
- 1 tsp Pepper
- 1 tsp Garlic Powder
Directions:
-
Cook the Macaroni: Boil a large pot of salted water. Add the elbow macaroni and cook it according to the package instructions until it is al dente, usually around 7-8 minutes. Once cooked, drain the pasta and set it aside.
-
Make the Cheese Sauce: In a medium-sized saucepan, melt the butter over medium heat. Once the butter is melted, add the flour to the pan. Cook for about 1-2 minutes, stirring constantly, until the mixture is smooth and slightly bubbly. Gradually whisk in the milk. Keep stirring until the sauce begins to thicken, which should take about 5 minutes.
-
Incorporate Cheese: Lower the heat to low and add the shredded cheddar cheese to the thickened milk mixture. Stir well until all the cheese is melted and the sauce is creamy. Season the sauce with salt, pepper, and garlic powder, mixing well to combine.
-
Combine Pasta and Cheese: Add the cooked elbow macaroni to the cheese sauce. Stir thoroughly so that every piece of macaroni is coated with the creamy cheese mixture. Set this mixture aside.
-
Shape the Rib Cage: Open the can of crescent roll dough and unroll it onto a clean surface. Instead of forming standard rolls, shape the dough into rib-like structures. You can make small strips or curves to mimic the bones of a ribcage. Be creative, but ensure the pieces are sturdy enough to hold up during baking.
-
Assemble the Dish: Prepare a baking dish by greasing it lightly. Pour the macaroni and cheese mixture into the dish evenly. Then, lay the shaped crescent dough on top, arranging it to resemble a rib cage delicately.
-
Top with Breadcrumbs: Sprinkle the breadcrumbs evenly over the entire dish, covering the crescent dough. This will give it a delightful crunch once baked.
-
Bake: Preheat your oven to 350°F (175°C). When the oven is hot, place your baking dish inside and bake for about 20-25 minutes, or until the top is golden brown and the cheese sauce is bubbling around the edges.
-
Cool and Serve: Once baked, remove the dish from the oven and let it sit for a few minutes to cool slightly. This will make it easier to serve and enjoy!
How to Serve Rib Cage Mac & Cheese
Rib Cage Mac & Cheese serves well as a fun and filling main course. You can highlight its playful design by cutting the dish into sections and allowing diners to see the rib structure when it’s served.
To make your meal even more enjoyable, consider serving the mac and cheese with a side salad to add some freshness. A simple green salad with a light vinaigrette pairs nicely. You may also serve it with grilled vegetables or steamed broccoli, as the veggie crunch can complement the creamy texture of the mac and cheese.
Feel free to let your creativity flow by garnishing the dish with finely chopped herbs like parsley or chives for a touch of color. This adds a nice look and fresh flavor that enhances the whole meal experience.
How to Store Rib Cage Mac & Cheese
Leftovers are always a treat with Rib Cage Mac & Cheese. Storing it properly will help maintain its rich flavors and delightful texture. When you have extras:
-
Cool the Dish: Allow the mac & cheese to cool to room temperature. This effort will prevent condensation from forming inside the storage container, which could lead to sogginess.
-
Use Airtight Containers: Store the leftovers in airtight containers. This helps keep the moisture in and prevents the dish from drying out in the fridge.
-
Refrigerate: Place the container in the refrigerator, where it can be stored for up to 3-4 days. Remember to label your container with the date it was made, so you’ll keep track of freshness.
-
Freezing Options: If you want to store the dish for an extended period, you can freeze it. Transfer the cooled mac & cheese into a freezer-safe container or freezer bags. It can be frozen for up to 2-3 months.
When you are ready to enjoy the leftovers, just thaw them in the fridge overnight and reheat in the oven or microwave until warmed through!
Tips to Make Rib Cage Mac & Cheese
-
Cheese Variety: While cheddar is a delicious choice, feel free to experiment with other cheeses too! Mixing in Monterey Jack, Gouda, or even a bit of cream cheese can add different flavors and creaminess to your dish.
-
Pasta Options: Though elbow macaroni is traditional, other pasta shapes like shells or penne work just as well. Choose a shape that will hold ample cheese sauce.
-
Make It Spicy: If you enjoy a bit of heat, add crushed red pepper flakes or some diced jalapeños to the cheese sauce. This addition will give a flavorful kick to the dish.
-
Vegetable Add-Ins: Feel free to mix in vegetables for some added nutrition. Diced tomatoes, sautéed spinach, or even roasted peppers are excellent choices that complement cheese very well.
-
Add Protein: Want to make it a complete meal? Adding cooked chicken, bacon, or crumbled sausage will give a heartier feel to the mac and cheese.
-
Crispier Topping: For an extra crispy crust, broil the dish for the last couple of minutes of baking. Just keep a close eye on it to ensure it doesn’t burn.
Variation
While the Rib Cage Mac & Cheese is unique in its presentation, there are variations you can try.
-
Barbecue Rib Cage Mac & Cheese: Mix in some barbecue sauce with the cheese sauce, and top it off with barbecue-flavored breadcrumbs for an innovative twist.
-
Loaded Rib Cage Mac & Cheese: Incorporate toppings like crispy bacon, green onions, or jalapeños. You can even drizzle some ranch or hot sauce before serving for a burst of flavor.
-
Holiday Rib Cage Mac & Cheese: During holidays, add seasonal ingredients like roasted butternut squash or pumpkin puree to the cheese sauce. This variation gives a nostalgic taste that aligns with the festive spirit.
FAQs
Can I use gluten-free pasta for this recipe?
Yes, you can definitely use gluten-free pasta! Look for gluten-free elbow macaroni or another pasta shape that you enjoy. Just be mindful that cooking times may vary, so check the package instructions for the best results.
Can I prepare Rib Cage Mac & Cheese ahead of time?
Absolutely! You can prepare the macaroni and cheese mixture in advance and store it in the refrigerator until you’re ready to shape the rib cage with the crescent rolls. Just remember to bake it on the day you plan to serve it for the best texture.
Is Rib Cage Mac & Cheese suitable for kids?
Yes! Rib Cage Mac & Cheese is a fun and kid-friendly dish. The fun rib cage shape can engage children, making mealtime more enjoyable. Additionally, it’s a great way to sneak in some veggies if you choose to add them.
How can I make this dish lighter?
To make a lighter version of Rib Cage Mac & Cheese, consider using reduced-fat cheese and milk. You could also substitute some of the pasta with steamed cauliflower or zucchini noodles, maintaining the cheesy goodness while cutting down on carbs.
Can I use a different type of dough instead of crescent roll dough?
Certainly! You could use puff pastry or biscuit dough if you prefer. Just ensure it’s sturdy enough to maintain the shape while baking, similar to the crescent roll dough.
Rib Cage Mac & Cheese is more than a meal; it’s an experience. Whether you serve it at gatherings or enjoy a family dinner, this dish is all about comfort, creativity, and of course, cheese! Happy cooking!